What Mode Are You In?
If you are not happy with the photos your camera is producing, you might not be in a very good mood. Achieving a proper exposure might change your mood. The real problem might be the camera's shooting mode. In the previous post, there was some discussion about understanding the 3 elements that add up to a proper exposure: aperture, shutter speed, and ISO. Selecting a specific shooting mode on your camera, can either limit you or open the the possibility of varying these 3 exposure elements. "What are you talking about?" you might be saying. DSLRs and some point-and-shoot cameras have a selection of shooting modes. Normally they are found on a dial on the top of the camera. These are the most common modes.
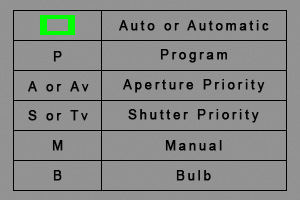
The Auto or Automatic setting is normally designated by a green rectangle. It is totally automatic; you make no decisions about aperture, shutter speed, or ISO. The camera does it all. Does it do it correctly? Sometimes, it will make the right decisions on the 3 elements of exposure, well maybe in some situations but not always. It even might activate the built in flash at the right time, or it might not. The decisions are made by the camera manufacturer's sophisticated algorithms using info received from the built in light meter. You are just pointing, shooting and hoping for the best. Sometimes your hopes and dreams are met, and other times, you are faced with disappointment or frustration. Maybe both. The way one sets up the light meter, will influence the outcome. It will either convey appropriate info or it might not. (Check on light meter set up in the 12/1/2011 post.) If you wish to take control of some or all of the elements of exposure, you will be required to move away from Automatic.
The Program mode, usually designated by P (some think it means Professional - not so), will give you one level of adjustment. Program allows the user to set the ISO. The camera decides on the aperture and shutter speed. Although one will gain some benefit from controlling the ISO, it is not enough for most. Okay, maybe for a snapshot but not your best work. The camera recognizes the ISO you have chosen, then selects an aperture and shutter speed combination based on an algorithm and the light meter information. You may be starting to see the importance of the light meter information.
Aperture Priority mode is just that; it gives the aperture setting the priority. It is normally designated by an A or Av (aperture value) on the settings dial. The camera operator sets the ISO and the desired aperture; the camera selects the shutter speed. Selecting the aperture allows for control of the depth of field or what is in focus. For images where maximum depth of field is desired, an f-stop like 16 may be desirable. For a shallow depth of field, an f-stop like 4 might be your pick. The shutter speed is determined by the camera using info from the light meter.
Shutter Priority mode gives the priority to the shutter speed. S or Tv (time value) is the normal dial marking. The ISO and the shutter speed is selected by the operator, and the camera chooses the aperture. This is especially helpful when one wants to control motion. A slow shutter speed will allow a motion blur to be captured. A fast shutter speed will freeze motion. The camera picks the appropriate aperture, as before, based on the info from the light meter.
M or Manual mode may strike fear in into the hearts of many, but it is the mode where the camera operator takes full control of all 3 elements of exposure. Set the ISO, then while looking through the viewfinder set both the shutter speed and the aperture. The camera operator still needs to consider the shutter speed in relation to controlling motion and aperture in relation to depth of field. It takes a little practice, but if you stick at it, this may be your preferred shooting mode. It is the mode that makes the shooter responsible for the good, the bad, and the ugly. With practice, there will be more good than ugly.
Bulb, usually designated by a B, is for long exposures. It, like Manual mode, allows for control of the aperture, shutter speed, and ISO. The difference is that on most cameras, there is a limit to the maximum slow shutter speed setting. Sometimes, a longer shutter speed is needed beyond what is provided by a camera setting. Bulb allows for holding the shutter button down for as long as might be desired. My camera can be set to a maximum slow shutter speed of 30 seconds. If I need the shutter to remain open longer, Bulb is the answer. When would you use bulb? Capturing stars in the sky, fireworks, and many other low light situations. For these slow shutter speeds, a tripod and a shutter release are often desirable. The shutter release is a cable which connects to the camera and enables the activation of the shutter without touching the camera, reducing any added vibration. The tripod and cable release are pretty essential tools for slow shutter speeds.
Now you have a simple explanation of shooting modes. You can take more control over your photos by understanding and using the modes that give you the control that you need.
Note: on some cameras, there are modes for Portrait, Landscape, Sports/Action, Night, etc., these are just variations on the main modes listed above. For example, Sports/Action is a Shutter Priority with the shutter speed set at 1/250 or higher. Check your camera's manual for more info pertaining to your manufacturer and camera model.
Check on earlier posting for info on exposure and light meter settings


Wow very helpful post! I was trying to start photographing as a hobby.
ReplyDeleteMust say i've learned quite a lot thank you once again!
I will be following this blog, Hope to learn a lot of more stuff in the future.
Please check out mine too if you've the time :)