Scanners - Not the SciFi Thriller
 The main tools used for scanning a photo are the computer and the scanner. You need a computer in order to have a connecion point for the scanner. It is important if you want to see the preview of the scan, set the proper adjustments, and have a place for the scanned file to land.
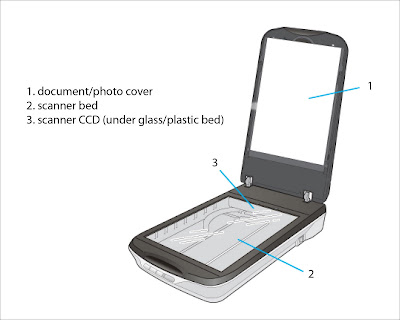
The scanner is not too intimidating a device. Once you connect it to your computer and install the software that arrives with it, you are just about ready to go. Hit the power switch and open the top of the scanner. The diagram above reflects the main parts of flatbed scanners. #1 is the document cover; in our case it is the photo cover. Make sure it is in place when you copy photos. You will remove it if you are scanning negatives or transparencies (slides or positives). You can figure this out on your own. I'm going to focus on scanning photos. #2 is the scanner bed. This is where you will place the photos - face down. #3 is where the scanning actually happens. It is the scanning sensor. It is under the scanner's glass/plastic bed. It is much like the sensor found in many digital cameras. Usually, it is a CCD type sensor. This sensor moves under the bed capturing the pixel information.
Scanner selection has some importance which will vary with your need to enlarge image beyond their original size. The most economical scanners (cheapies) have an optical or hardware resolution of 600 ppi to 1200 ppi. IMPORTANT NOTE: Scanner companies report resolution as dpi, dots per inch. This is actually incorrect, but it has become an industry standard term. For our purposes, if the scanner specs indicate dpi, consider them the same as ppi. If you wish to know my opinion of how this all came about, add a comment.
Scanner specs may list another resolution, like 'effective resolution', this means there is interpolation going on in the scanner program. Personally, I don't like this automatic interpolation. If I must do interpolation, I'll do it in a photo editing program like Photoshop or Photoshop Elements. The scanner that I use (Epson 4870) has a hardware or optical resolution of 4800 ppi; for my purposes, this works well for me. This type of scanner is in the $100 to $150 price range.
I'll use some screen captures to walk through my scanning process. This may be a little bit of an eye test depending on the size of your monitor. I added some additional screen shots since the originals are so, so small. Clicking on the images doesn't always show them in a larger format. (added to post at 9:32 AM CST)

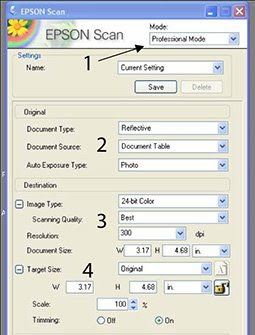
Start by turning on the scanner and opening the scanner software. Place the photo that you wish to copy on the scanner bed, face down in the upper left hand corner. If the photo on the scanner bed is not visible when the software opens, select #6 to generate the preview. Look for something like #1; if your software has multiple modes/options, select the one with all the manual options. In this instance it is the Professional mode (not the Auto or Home modes). #2, this is a reflective, photo, document - choose those settings. I'm skipping to #5; use your mouse cursor to outline the area of the image to be scanned. I normally attempt to minimize the white or dark borders, but you might like the "soiled edges" of the original. #3, select the bit depth and resolution. For most people that are digitizing family images 24 bit for color and 8 bit for grayscale (black & white) will work fine. If you are going to print the images, select 300 ppi/dpi unless you have your heart set on something else. Make sure your alternate setting is between 240 and 360 ppi/dpi. #4, if you know the maximum size you might print the image, enter it here; normally, the aspect ratio will be automatically maintained.
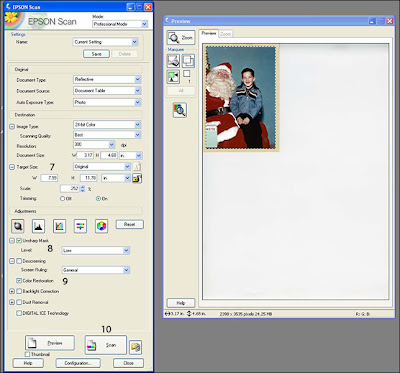
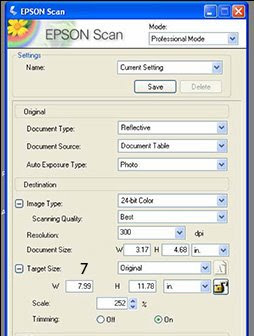

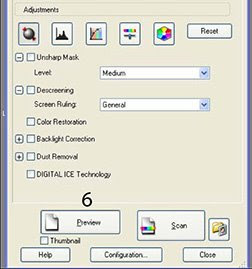
Re-check the output sizes and resolution, #7. In #8, I often add a low amount of Unsharp Mask. The name is confusing as it is a carry over from the offset printing industry. It doesn't actually sharpen, but it gives a slight illusion of sharpness by increasing contrast at the edges throughout the photo. If you are working with a slightly discolored, color photograph, You may wish to try #9. This control attempts to fix color shifts:normally you see the adjustment in the preview. Use it or not; you be the judge. Click on #10 to generate the scan.
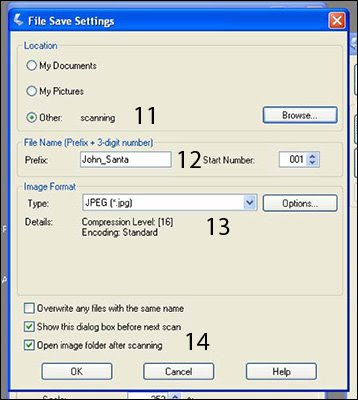
You will likely be confronted with one more dialog box. This time the software is asking where to put the scan, and what to name it. #11 allows the selection of the folder to place the scan. #12 is the place to name the file and add a sequence number if you are planning to use the same file name multiple times (like, John_1, John_2, John_3, etc). #14 may offer other options depending on the software. Click OK and the scan will be placed and named as you determined.

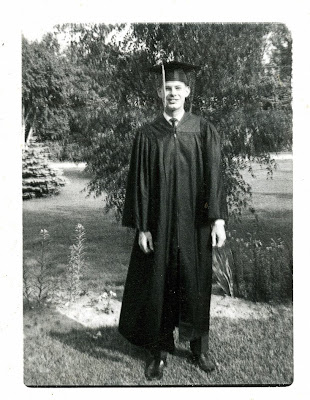
Here is the scan from my example. Perhaps, I'll send this to my youngest brother as a Christmas card next year. Let's talk about archiving tomorrow!


You mention that your current Epson scanner has an optical resolution of 4800 ppi/dpi, yet I was thinking that as long as I can scan to 300 ppi I'm cool. Why would you need so much additional resolution, and when would you use that? Your post today assumes the reader has already chosen a scanner and now wants to go to work. But could you please back up a step and say something about choosing a scanner for what you want to do with it?
ReplyDeleteSincerely,
Ducks...Bert Ducks
Dear BD,
ReplyDeleteIf you scanner will yield a scan at the maximum print size you desire and it is 300 ppi, you are probably good to go. What’s the difference as compared to scanners with a higher resolution? If you scan at a higher resolution, the scan will take longer. On my scanner a 600 ppi scan takes about 10x longer than a 300 ppi scan (scanner set to RGB 24 bit color). I sometimes scan at higher resolution if I am going to do a lot of restoration work on an image; it just adds more information. To archive images that are going to require little restoration, 300 ppi will likely suit your needs. I’ll write about scanner differences and photo editing software on Friday.
Happy to field you comments, Dr. D.